WebSocket
WebSocket 为客户端、浏览器和服务端提供了双工异步通信的功能,即客户端(浏览器、Android)可以向服务器发送消息,服务器端也可以向客户端发送消息。
WebSocket 是通过一个 socket 来实现双工异步通信能力的。但是直接使用 WebSocket 协议开发程序会十分繁琐,因此我们使用它的子协议 STOMP,它是一个更高级别的协议。STOMP 协议使用一个基于帧的格式来定义消息,与 HTTP 的 request 和 response 类似(具有类似于 @RequestMpping 的注解 @MessageMapping)。
Spring Boot 的支持
Spring Boot 对内嵌的 Tomcat、Jetty 和 Undertow 使用 WebSocket 提供了支持。
Spring Boot 为 WebSocket 提供的 starter pom 是 spring-boot-starter-websocket。
服务器端
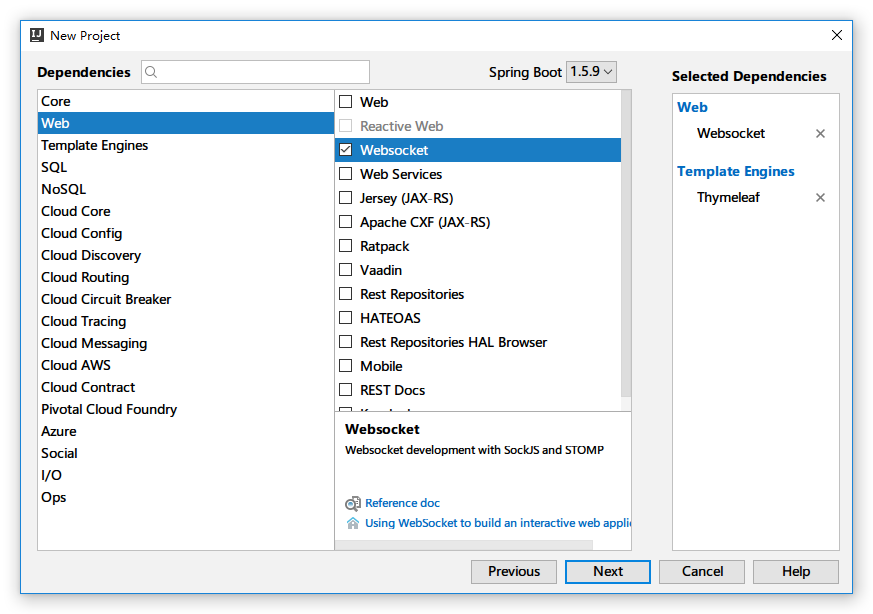
使用 Intellij IDEA + maven 搭建。
spring-boot-starter 选择 Thymeleaf 和 WebSocket
创建拦截器
拦截器可以在 WebSocket 握手前后进行一些预设置。
HandshakeInterceptor.java
1
2
3
4
5
6
7
8
9
10
11
12
13
14
15
16
17
18
19
20
21
22
23
24
25
26
27
28
29
30
31
32
33
| package me.xlui.im.config;
import org.slf4j.Logger;
import org.slf4j.LoggerFactory;
import org.springframework.http.server.ServerHttpRequest;
import org.springframework.http.server.ServerHttpResponse;
import org.springframework.web.socket.WebSocketHandler;
import org.springframework.web.socket.server.support.HttpSessionHandshakeInterceptor;
import java.util.Map;
public class HandshakeInterceptor extends HttpSessionHandshakeInterceptor {
private static Logger logger = LoggerFactory.getLogger("xlui");
@Override
public boolean beforeHandshake(ServerHttpRequest request, ServerHttpResponse response, WebSocketHandler wsHandler, Map<String, Object> attributes) throws Exception {
logger.info("HandshakeInterceptor: beforeHandshake");
logger.info("Attributes: " + attributes.toString());
return super.beforeHandshake(request, response, wsHandler, attributes);
}
@Override
public void afterHandshake(ServerHttpRequest request, ServerHttpResponse response, WebSocketHandler wsHandler, Exception ex) {
logger.info("HandshakeInterceptor: afterHandshake");
super.afterHandshake(request, response, wsHandler, ex);
}
}
|
创建配置类
WebSocketConfig.java:
1
2
3
4
5
6
7
8
9
10
11
12
13
14
15
16
17
18
19
20
21
22
23
24
25
26
27
28
29
30
31
| package me.xlui.im.config;
import org.springframework.context.annotation.Configuration;
import org.springframework.messaging.simp.config.MessageBrokerRegistry;
import org.springframework.web.socket.config.annotation.AbstractWebSocketMessageBrokerConfigurer;
import org.springframework.web.socket.config.annotation.EnableWebSocketMessageBroker;
import org.springframework.web.socket.config.annotation.StompEndpointRegistry;
@Configuration
@EnableWebSocketMessageBroker
public class WebSocketConfig extends AbstractWebSocketMessageBrokerConfigurer {
@Override
public void registerStompEndpoints(StompEndpointRegistry stompEndpointRegistry) {
stompEndpointRegistry.addEndpoint("/im").addInterceptors(new HandshakeInterceptor()).withSockJS();
}
@Override
public void configureMessageBroker(MessageBrokerRegistry registry) {
registry.enableSimpleBroker("/b", "/g", "/user");
registry.setUserDestinationPrefix("/user");
}
}
|
通过注解 @EnableWebSocketMessageBroker 开启使用 STOMP 协议来传输基于代理(message broker)的消息,这时控制器使用 @MessageMapping 就像使用 @RequestMapping 一样。
消息发送与接收类
Message.java:
1
2
3
4
5
6
7
8
9
10
11
12
| package me.xlui.im.message;
public class Message {
private String name;
public String getName() {
return name;
}
}
|
Response.java:
1
2
3
4
5
6
7
8
9
10
11
12
13
14
15
16
| package me.xlui.im.message;
public class Response {
private String responseMessage;
public Response(String responseMessage) {
this.responseMessage = responseMessage;
}
public String getResponseMessage() {
return responseMessage;
}
}
|
控制器
1
2
3
4
5
6
7
8
9
10
11
12
13
14
15
16
17
18
19
20
21
22
23
24
25
26
27
28
29
30
31
32
33
34
35
36
37
| package me.xlui.im.web;
import me.xlui.im.message.ChatMessage;
import me.xlui.im.message.Message;
import me.xlui.im.message.Response;
import org.springframework.beans.factory.annotation.Autowired;
import org.springframework.messaging.handler.annotation.DestinationVariable;
import org.springframework.messaging.handler.annotation.MessageMapping;
import org.springframework.messaging.handler.annotation.SendTo;
import org.springframework.messaging.simp.SimpMessagingTemplate;
import org.springframework.stereotype.Controller;
@Controller
public class WebSocketController {
@Autowired
SimpMessagingTemplate simpMessagingTemplate;
@MessageMapping("/broadcast")
@SendTo("/b")
public Response say(Message message) {
return new Response("Welcome, " + message.getName() + "!");
}
@MessageMapping("/group/{groupID}")
public void group(@DestinationVariable int groupID, Message message) {
Response response = new Response("Welcome to group " + groupID + ", " + message.getName() + "!");
simpMessagingTemplate.convertAndSend("/g/" + groupID, response);
}
@MessageMapping("/chat")
public void chat(ChatMessage chatMessage) {
Response response = new Response("Receive message from user " + chatMessage.getFromUserID() + ": " + chatMessage.getMessage());
simpMessagingTemplate.convertAndSendToUser(String.valueOf(chatMessage.getUserID()), "/msg", response);
}
}
|
浏览器演示页面
静态资源放在 src/main/resources/static 下
广播 broadcast.html
1
2
3
4
5
6
7
8
9
10
11
12
13
14
15
16
17
18
19
20
21
22
23
24
25
26
27
28
29
30
31
32
33
34
35
36
37
38
39
40
41
42
43
44
45
46
47
48
49
50
51
52
53
54
55
56
57
58
59
60
61
62
63
64
65
66
67
68
69
70
71
72
| <!doctype html>
<html xmlns:th="http://www.thymeleaf.org">
<head>
<meta http-equiv="Content-Type" content="text/html;charset=UTF-8"/>
<title>Spring Boot WebSocket 广播式</title>
</head>
<body onload="disconnect()">
<noscript>
<h2 style="color: #ff0000;">貌似你的浏览器不支持 websocket</h2>
</noscript>
<div>
<button id="connect" onclick="connect();">连接</button>
<button id="disconnect" onclick="disconnect();" disabled="disabled">断开连接</button>
</div>
<div id="conversationDiv">
<label for="name">输入你的名字:</label>
<input type="text" id="name" placeholder="name"/>
<button id="sendName" onclick="sendName();">发送</button>
<p id="response"></p>
</div>
<script th:src="@{sockjs.min.js}"></script>
<script th:src="@{stomp.min.js}"></script>
<script th:src="@{jquery.js}"></script>
<script type="text/javascript">
var stompClient = null;
function setConnected(connected) {
conn = $('#connect');
disconn = $('#disconnect');
if (connected) {
conn.attr('disabled', 'true');
disconn.removeAttr('disabled');
} else {
conn.removeAttr('disabled');
disconn.attr('disabled', 'true');
}
document.getElementById('conversationDiv').style.visibility = connected ? 'visible' : 'hidden';
$('#response').html();
}
function connect() {
var socket = new SockJS("/im");
stompClient = Stomp.over(socket);
stompClient.connect({}, function (frame) {
setConnected(true);
console.log('Connected: ' + frame);
stompClient.subscribe('/b', function (response) {
showResponse(JSON.parse(response.body).response);
});
});
}
function disconnect() {
if (stompClient != null) {
stompClient.disconnect();
}
setConnected(false);
console.log('Disconnected');
}
function sendName() {
var name = $('#name').val();
stompClient.send('/broadcast', {}, JSON.stringify({'name': name}));
}
function showResponse(message) {
var response = $('#response');
response.html(response.text() + '\r\n' + message);
}
</script>
</body>
</html>
|
动态群组与点对点聊天的代码见 GitHub。
配置路径映射
WebMvcConfig.java:
1
2
3
4
5
6
7
8
9
10
11
12
13
14
15
| package me.xlui.im.config;
import org.springframework.context.annotation.Configuration;
import org.springframework.web.servlet.config.annotation.ViewControllerRegistry;
import org.springframework.web.servlet.config.annotation.WebMvcConfigurerAdapter;
@Configuration
public class WebMvcConfig extends WebMvcConfigurerAdapter {
@Override
public void addViewControllers(ViewControllerRegistry registry) {
registry.addViewController("/broadcast").setViewName("/broadcast");
registry.addViewController("/group").setViewName("/group");
registry.addViewController("/chat").setViewName("/chat");
}
}
|
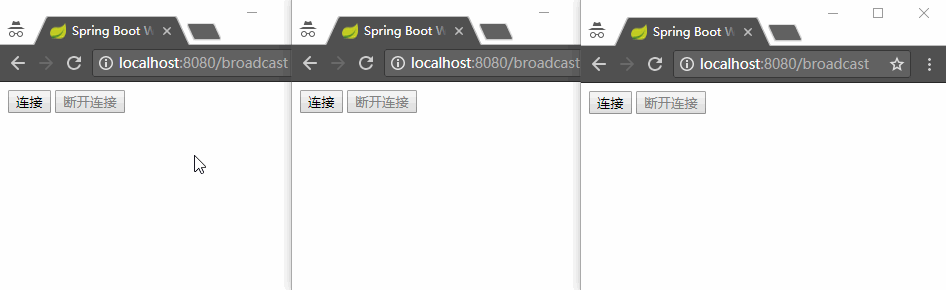
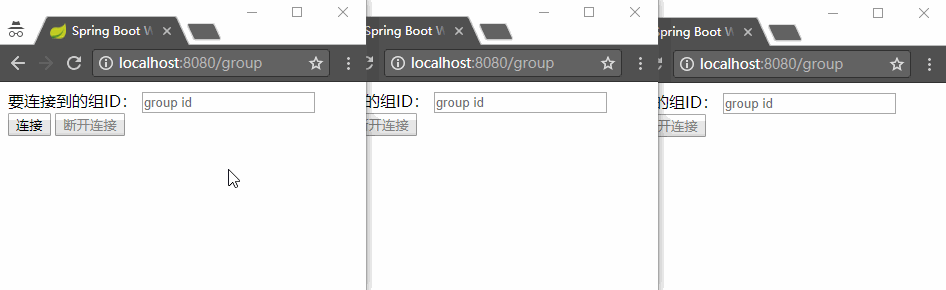
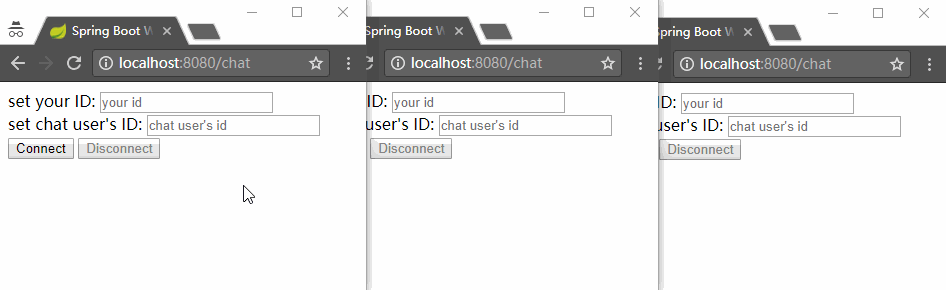
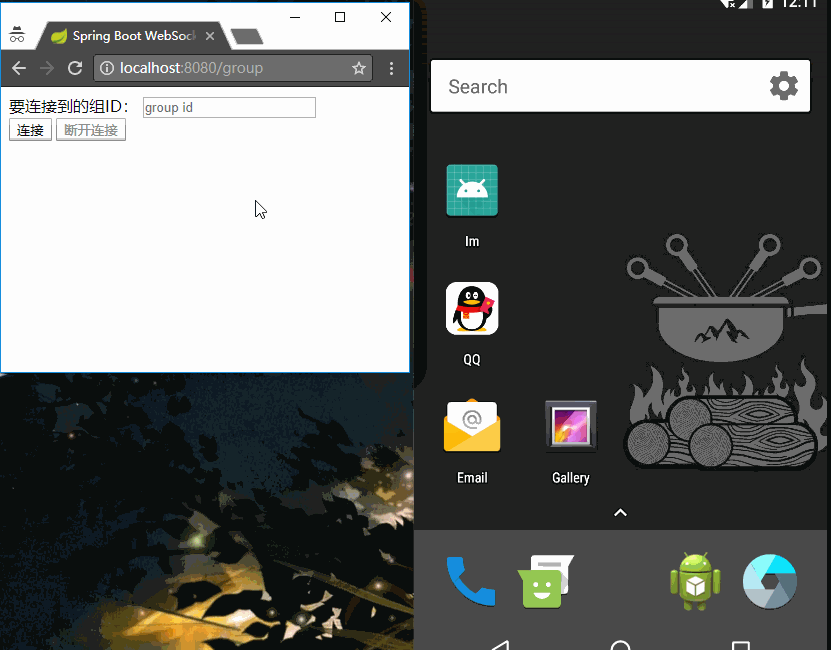
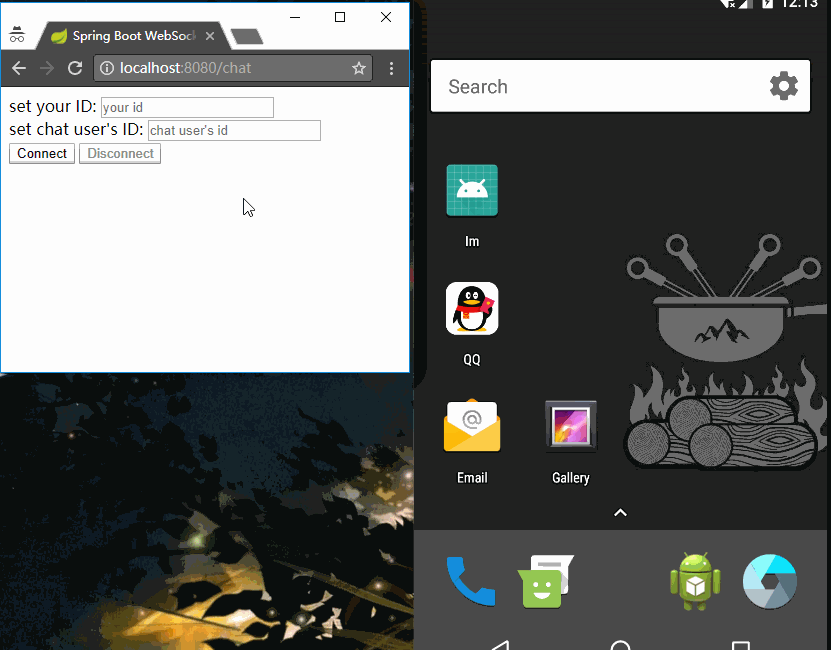
浏览器测试
运行程序,浏览器同时打开数个窗口,连接。
广播
动态群组
点对点
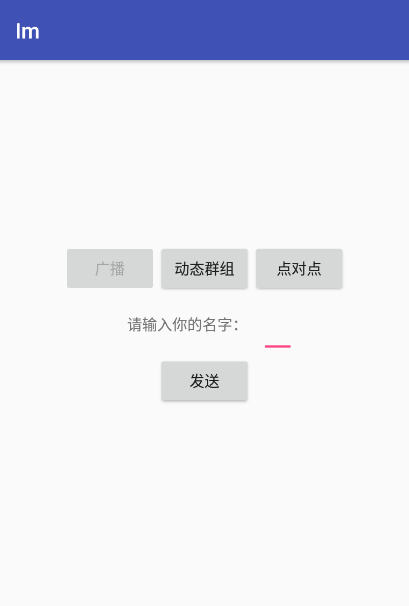
安卓客户端
STOMP 协议在 Android 系统中没有默认实现,不过有开源项目已经实现了,所以我们只需要添加依赖直接使用就好。
build.gradle(project)
1
2
3
4
5
6
7
8
| allprojects {
repositories {
google()
jcenter()
maven { url "https://jitpack.io" }
// 添加 maven 仓库
}
}
|
build.gradle(app)
1
2
3
| compile 'com.squareup.okhttp3:okhttp:3.9.0'
compile 'org.java-websocket:Java-WebSocket:1.3.7'
compile 'com.github.NaikSoftware:StompProtocolAndroid:1.4.3'
|
我们使用的是 StompProtocolAndroid,它同时依赖于 WebSocket 的标准实现 Java-WebSocket。
不过 Java-WebSocket 实现的 WebSocket 类在我这里不太好使,所以我换了 okhttp 实现的 WebSocket 类。
网络权限
在 AndroidManifest.xml 中添加网络权限:
1
| <uses-permission android:name="android.permission.INTERNET"/>
|
布局
1
2
3
4
5
6
7
8
9
10
11
12
13
14
15
16
17
18
19
20
21
22
23
24
25
26
27
28
29
30
31
32
33
34
35
36
37
38
39
40
41
42
43
44
45
46
47
48
49
50
51
52
53
54
55
56
57
58
59
60
61
62
63
64
65
66
67
68
69
70
71
| <?xml version="1.0" encoding="utf-8"?>
<LinearLayout xmlns:android="http://schemas.android.com/apk/res/android"
xmlns:tools="http://schemas.android.com/tools"
android:layout_width="match_parent"
android:layout_height="match_parent"
android:gravity="center"
android:orientation="vertical"
tools:context="me.xlui.im.activities.BroadcastActivity">
<LinearLayout
android:layout_width="wrap_content"
android:layout_height="wrap_content"
android:orientation="horizontal">
<Button
android:id="@+id/broadcast"
android:layout_width="wrap_content"
android:layout_height="wrap_content"
android:layout_weight="1"
android:text="@string/broadcast" />
<Button
android:id="@+id/groups"
android:layout_width="wrap_content"
android:layout_height="wrap_content"
android:layout_weight="1"
android:text="@string/groups" />
<Button
android:id="@+id/chat"
android:layout_width="wrap_content"
android:layout_height="wrap_content"
android:layout_weight="1"
android:text="@string/chat" />
</LinearLayout>
<LinearLayout
android:layout_width="wrap_content"
android:layout_height="wrap_content"
android:gravity="center_vertical|center"
android:orientation="horizontal">
<TextView
android:layout_width="wrap_content"
android:layout_height="wrap_content"
android:padding="12dp"
android:text="@string/broadcast_prompt" />
<EditText
android:id="@+id/name"
android:layout_width="wrap_content"
android:layout_height="wrap_content"
android:inputType="text"
android:padding="16dp" />
</LinearLayout>
<Button
android:id="@+id/send"
android:layout_width="wrap_content"
android:layout_height="wrap_content"
android:text="@string/send" />
<TextView
android:id="@+id/show"
android:layout_width="wrap_content"
android:layout_height="wrap_content" />
</LinearLayout>
|
主程序
广播 Activity 的代码,其他代码(动态群组、点对点)见 GitHub。
1
2
3
4
5
6
7
8
9
10
11
12
13
14
15
16
17
18
19
20
21
22
23
24
25
26
27
28
29
30
31
32
33
34
35
36
37
38
39
40
41
42
43
44
45
46
47
48
49
50
51
52
53
54
55
56
57
58
59
60
61
62
63
64
65
66
67
68
69
70
71
72
73
74
75
76
77
78
79
80
81
82
83
84
85
86
87
88
89
90
91
92
93
94
95
96
97
98
99
100
101
102
103
104
105
106
107
108
109
110
111
112
113
| package me.xlui.im.activities;
import android.content.Intent;
import android.support.v7.app.AppCompatActivity;
import android.os.Bundle;
import android.util.Log;
import android.widget.Button;
import android.widget.EditText;
import android.widget.TextView;
import android.widget.Toast;
import org.json.JSONException;
import org.json.JSONObject;
import org.reactivestreams.Subscriber;
import org.reactivestreams.Subscription;
import me.xlui.im.R;
import me.xlui.im.conf.Const;
import me.xlui.im.util.StompUtils;
import okhttp3.WebSocket;
import ua.naiksoftware.stomp.Stomp;
import ua.naiksoftware.stomp.client.StompClient;
public class BroadcastActivity extends AppCompatActivity {
private Button broadcast;
private Button groups;
private Button chat;
private EditText name;
private Button send;
private TextView result;
private void init() {
broadcast = findViewById(R.id.broadcast);
broadcast.setEnabled(false);
groups = findViewById(R.id.groups);
chat = findViewById(R.id.chat);
name = findViewById(R.id.name);
send = findViewById(R.id.send);
result = findViewById(R.id.show);
}
@Override
protected void onCreate(Bundle savedInstanceState) {
super.onCreate(savedInstanceState);
setContentView(R.layout.activity_broadcast);
this.init();
StompClient stompClient = Stomp.over(WebSocket.class, Const.address);
stompClient.connect();
Toast.makeText(this, "开始连接", Toast.LENGTH_SHORT).show();
StompUtils.connect(stompClient);
stompClient.topic(Const.broadcastResponse).subscribe(stompMessage -> {
JSONObject jsonObject = new JSONObject(stompMessage.getPayload());
Log.i(Const.TAG, "Receive: " + stompMessage.getPayload());
runOnUiThread(() -> {
try {
result.append(jsonObject.getString("response") + "\n");
} catch (JSONException e) {
e.printStackTrace();
}
});
});
send.setOnClickListener(v -> {
JSONObject jsonObject = new JSONObject();
try {
jsonObject.put("name", name.getText());
} catch (JSONException e) {
e.printStackTrace();
}
stompClient.send(Const.broadcast, jsonObject.toString()).subscribe(new Subscriber<Void>() {
@Override
public void onSubscribe(Subscription s) {
Log.i(Const.TAG, "onSubscribe: 订阅成功!");
}
@Override
public void onNext(Void aVoid) {
}
@Override
public void onError(Throwable t) {
t.printStackTrace();
Log.e(Const.TAG, "发生错误:", t);
}
@Override
public void onComplete() {
Log.i(Const.TAG, "onComplete: Send Complete!");
}
});
});
groups.setOnClickListener(v -> {
Intent intent = new Intent();
intent.setClass(BroadcastActivity.this, GroupActivity.class);
startActivity(intent);
this.finish();
});
chat.setOnClickListener(v -> {
Intent intent = new Intent();
intent.setClass(BroadcastActivity.this, ChatActivity.class);
startActivity(intent);
this.finish();
});
}
}
|
测试
广播

动态群组
点对点
源码
源代码已经上传到 GitHub,https://github.com/xlui/WebSocketExample,欢迎 star。